Navigation:
In this lesson, we will learn the basics of fingerstyle playing.
| 9.1 Fingerstyle? |
Fingerstyle playing, in simple terms, means to pluck the strings in a repeated pattern while holding a chord.
For fingerstyle playing, it is recommended that you leave the nails on your right hand slightly longer than usual for a cleaner/ brighter sound.
Plucking with the tips of your fingers causes undue friction and also produces a softer, muted sound.
| 9.2 Re: Finger Notations |

The fingers on the right-hand are represented as:
| p | thumb |
| i | index |
| m | middle |
| a | ring |
The little finger is not conventionally used in fingerstyle playing.
9.3 Positioning |

Rest your fingers on the respective strings near the soundhole as follows:
| p | 4th, 5th or 6th string |
| i | 3rd string |
| m | 2nd string |
| a | 1st string |
Notice that the thumb (p) is responsible for plucking the 4th, 5th and 6th strings (i.e. the bass strings).
A common question then is: ‘How do I know which bass string to pluck?’
In most cases, the bass note of a chord is its root note.
By locating the root note in the chord fingering, you can determine which bass string to pluck.
| Chords | Bass Note | Fingering |
| C, C7, Cm, Cm7 | C | 5th string, 3rd fret |
| D, D7, Dm, Dm7 | D | 4th string, open |
| E, E7, Em, Em7 | E | 6th string, open |
| F, F7, Fm, Fm7 | F | 6th string, 1st fret |
| G, G7, Gm, Gm7 | G | 6th string, 3rd fret |
| A, A7, Am, Am7 | A | 5th string, open |
| B, B7, Bm, Bm7 | B | 5th string, 2nd fret |
| 9.4 Tablature |
Tablatures (or tabs) are a simple alternative to traditional music scores and are widely used to showcase plucking patterns.
Let’s take a look at section of a typical tablature:
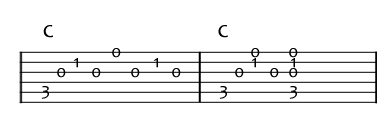
How to read Tablatures:
- Tablatures are made up of 6 lines; the top most line represents the 1st string and the last line represents the 6th string.
- The numbers on the lines represent the fret to play for that string.
- Play the notes from left to right.
- The chords are often shown above the lines.
- A series of numbers, stacked vertically, indicate to play all the notes at the same time.
In the next few exercises, we will look at some common plucking patterns for songs with 4/4 time signature.
| Exercise 9A |
Let’s try the plucking pattern using the G chord:
p i m a m i a m

- Notice that the pattern involves the bass + 4th, 3rd and 2nd strings. In such instances, use fingers i, m, a to pluck the 4th, 3rd and 2nd strings respectively.
- Set the metronome to 4/4 and 80.
- Increase the tempo to 90 & then 100 when you get more comfortable with the plucking pattern.
| Exercise 9B |
Let’s use the plucking pattern in Exercise 9A to play Just the Way You Are:
- Set the metronome to 4/4 and 80.
- Increase the tempo to 90 & then 100 when you get more comfortable with the plucking pattern.
Just the Way You Are


| Exercise 9C |
Let’s try the plucking pattern using the G chord:
p i m a – i m i

- ‘–‘ indicates a rest in the half-beat.
- Set the metronome to 4/4 and 80.
- Increase the tempo to 90 & then 100 when you get more comfortable with the plucking pattern.
| Exercise 9D |
Let’s use the plucking pattern in Exercise 9C to play Firework:
- Set the metronome to 4/4 and 80.
- Increase the tempo to 90 & then 100 when you get more comfortable with the plucking pattern.
Firework


Download Learn to Play Contemporary Guitar - Instructional Package [PDF] [Mediafire]
")

")
")


")


